Creating a model for 3D printing can be somewhat intimidating at first. Please keep some essential tips in mind before placing an order. Thoroughly reading our material design guides and sticking to this checklist will make sure that you get a 3D printable file.
-
Watertight/Manifold
Sometimes your model isn’t entirely closed because the different surfaces are well attached to each other. However, a 3D printable model needs to be completely manifold or “watertight.” It means that it cannot have any holes in its surface. What exactly does this mean? Think of it like this, if you were to fill your model with water, would you have any leaks? If so, you need to find those holes and close them by welding or stitching the surfaces together in your 3D software program or create a surface in between.
The design below is an example of a model that is not watertight. Notice the gap in its surface.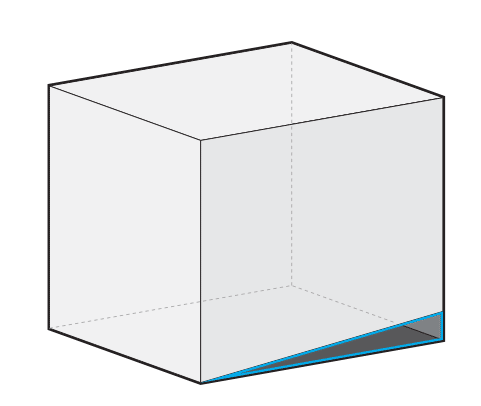
-
Wall Thickness and Volume
In 3D printing, wall thickness refers to the distance between one surface of your model and its opposite sheer surface. Wall thickness is defined as the minimum thickness your model should have at any time. It’s important that every surface of your 3D model has been assigned a wall thickness.
When using your 3D modeling software it's possible to design a surface without a wall thickness. However, 3D printers need the information about how thick you intend the wall of your object to be. Many printing problems can be traced back to wall thickness issues.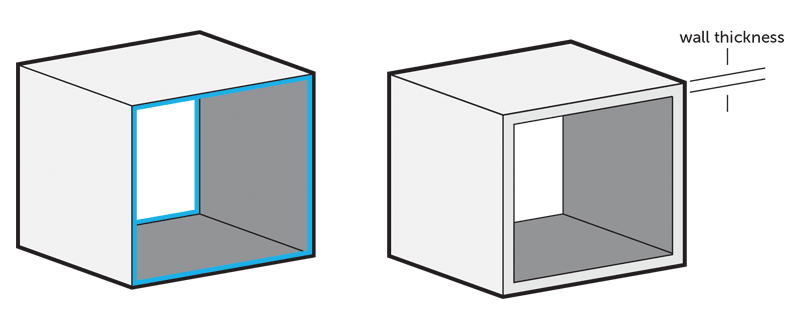
-
Auto Intersections/Internal Overlapping/Self-Intersecting Surfaces
While a model might look great for 3D printing from the outside, intersections in the model can make it unprintable and confuse 3D printers about what exactly you want to print. Intersections and walls within your design will therefore make life difficult. That’s why it makes sense to think about your model in a 2D space first.
In the case below, the left shape will not be printable once it is transformed into a 3D object since as it will feature paper-thin walls within the object. The shape on the right, however, won’t be a problem to print because it won’t feature those walls on the inside. In most cases, it is useful to implement a Boolean operation, which is a function that helps to merge several overlapping elements.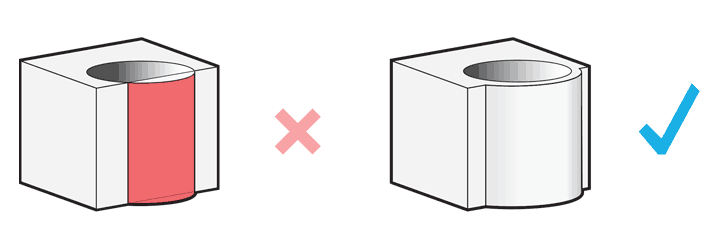
-
Inverted Normals/Reversed Faces/Surface Orientation
Another problem that can occur is the phenomenon of inverted normals or reversed faces. Most 3D modeling programs distinguish between the inside and outside of a surface in order to determine the model’s volume. A reversed face or inverted normal means that the surface of your model is facing in the wrong direction. Typically this means that it is facing the inside of the object instead of the outside. It’s important that you double-check your file and make sure that all normals are facing the correct direction.
-
Uploading Multiple Parts in a 3D File
Unfortunately, so-called grouped models are a common reason for us to cancel orders. For example, if you a design with six separate shells will get a notification that the order will be canceled (and then of course fully refunded).
Luckily for polyamide, alumide, standard resin, mammoth resin, transparent resin and gray resin, we have created specific design rules that make it possible to have several individual parts within a single 3D file.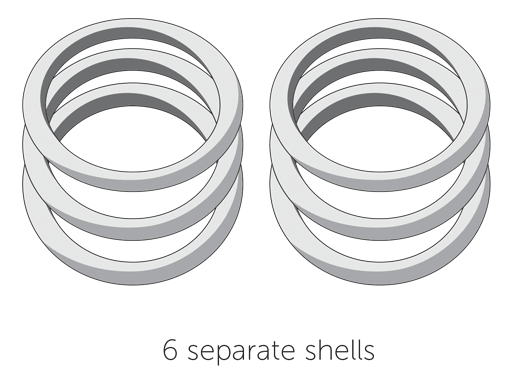
And when you need more than one print, simply upload the separate parts individually. If you order two or more copies of a model, the price per model automatically decreases for most materials, mainly because the preparation of multiple copies can be carried out more efficiently.
-
Small Details and Embossed/Engraved Text
Details or small decorative parts of an object such as embossed or engraved text, need to be of a certain size or they will not appear on the 3D printed model. The exact minimum size of the smallest possible features of the design heavily depends on the selected material. That’s why you need to carefully read through the design guide of the material. This is especially important if you intend to add details like embossed or engraved text. Sticking to the minimum detail size will make sure that everything is as readable as you intended.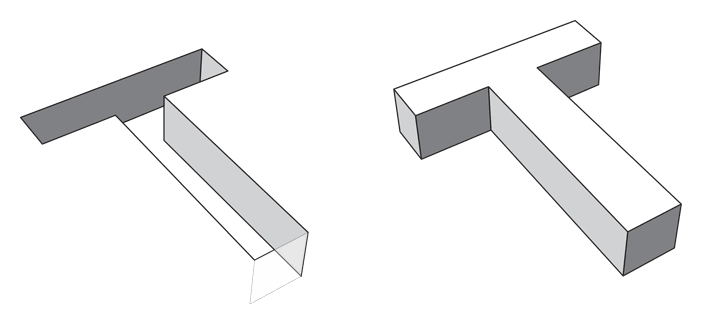
-
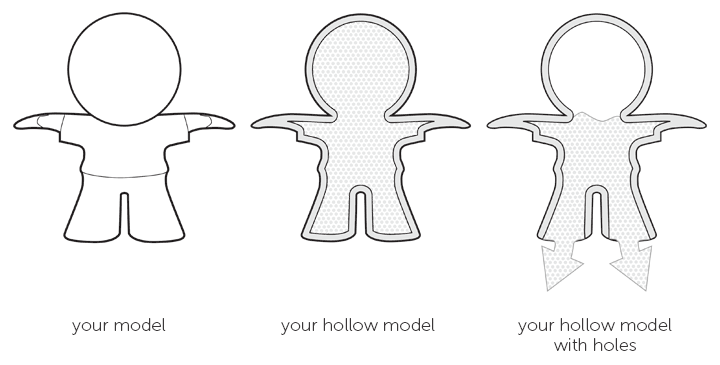
Hollowing and Escape Holes
A hollow model means that the interior of your object will not be solid. Solid designs are not necessarily a problem – they will be stronger and harder to break (depending on the material), but they will also be more expensive as more 3D printing material is used.
With a hollow model, the interior of your print will be empty (in theory). However, since our printers print layer by layer, 3D printing material can get trapped in the interior of your model (see the image in the middle below). If you would like to avoid this, you can add ‘escape holes’ to your design. Material that is not used for building your 3D print can then be removed.